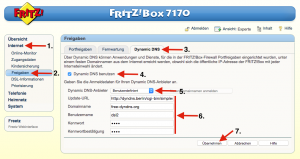
1. Click on “Internet”
2. Click on “Freigaben”
3. Change to the tab “Dynamic DNS”
4. Enable the “Dynamic DNS benutzen” function
5. Pick as “Dynamic DNS-Anbieter” “Benutzerdefiniert”
6. Type in in the order they are in the following list.
- Update-URL (please change nothing in that URL): https://dyndns.berlin/cgi-bin/simpleupdt_en.cgi?user=<username>&pass=<pass>&domn=<domain>&addr=<ipaddr>&reqc=0
- Complete DynDNS Domainname: e.g. test.dyndns.berlin or test.free-dyndns.org and so on (Depending on your choice when registering)
- Benutzername: Your username on dyndns.berlin
- Kennwort: Your password on dyndns.berlin
- Kennwortbestätigung: Your password on dyndns.berlin
7. Click on “Übernehmen” – Now your DynDNS is kept up to date by your Fritz!Box.
Do not be surprised if the following error appears in the Fritz!Box log:
Dynamic DNS-Fehler: Die Dynamic DNS-Aktualisierung war erfolgreich, anschließend trat jedoch ein Fehler bei der DNS-Auflösung auf.
This is normal because the DNS server don’t deliver the updated IP immediately.
This takes a few seconds up to 5 minutes.
 Deutsch
 English